
As a front-end developer, I was never really drawn to the "DevOps" side of my day-to-day work. The major reason is that up until now, in all of the places I have worked in, we've been using Jenkins. And while it's a powerful tool no doubt, it sure is unwelcoming and hard to get started with.
But in recent years GitHub has stepped into the game and in 2018 released "GitHub Actions", a platform for creating custom, automated development workflows directly within the GitHub ecosystem.
Whether you want to create a CI/CD pipeline or automate GitHub-related flows like opening a PR, adding automated comments, or sending a Slack notification each time someone merges a commit to master, GitHub Actions can help you create these processes and save you time and effort. And the best part is how straightforward it is!
In this guide, we'll cover the basics of GitHub Actions and show you how to get started with them. We'll go through the process of setting up a simple workflow and explain some of the key concepts you need to know. By the end, you'll be able to use GitHub Actions to automate your own workflow and take your productivity to the next level!
First, some GitHub Actions terminology
Well, the name might be GitHub Actions, but let's put that aside for one second. What we're actually running are workflows. A workflow is a collection of jobs that are triggered by an event.
Here's an example of a simple workflow's structure:
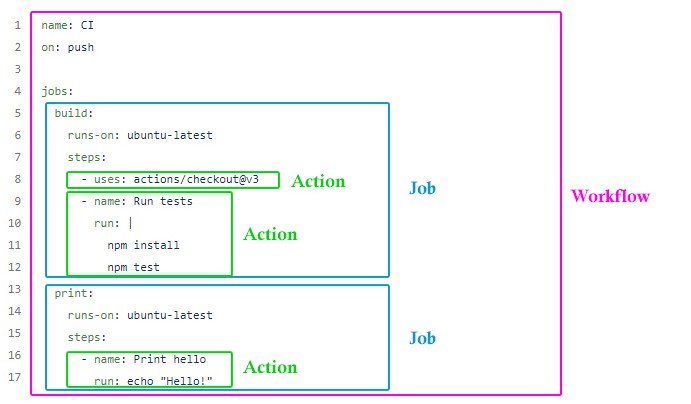
As you can see, this workflow is running two jobs. A job is a set of steps that are executed in sequence. Each step of a job can be an action. An action is an individual step within a job that can perform a variety of tasks such as running a script, building an application, deploying code, or running tests.
Setting up a workflow
GitHub actions and workflows are written in YAML, a language that is a superset of JSON and is considered easier on the eye. You'll notice that indentations are used instead of curly brackets.
For GitHub to recognize your .yml files as workflows you have to store them inside the following folder of your repository: .github/workflows/[workflow-name].yml
You can add a workflow manually by pushing your own files, or going to the "Actions" tab in your repo and either clicking on "set up a workflow yourself" or selecting one of the available templates GitHub suggests.
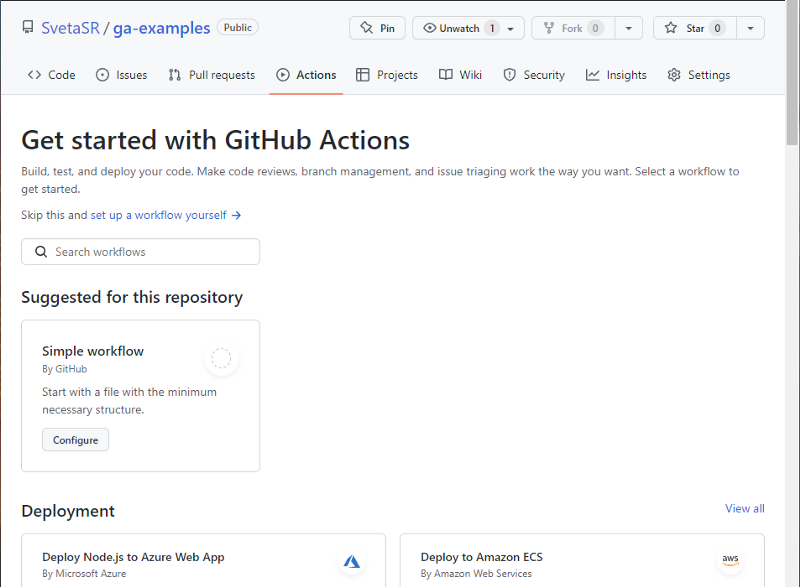
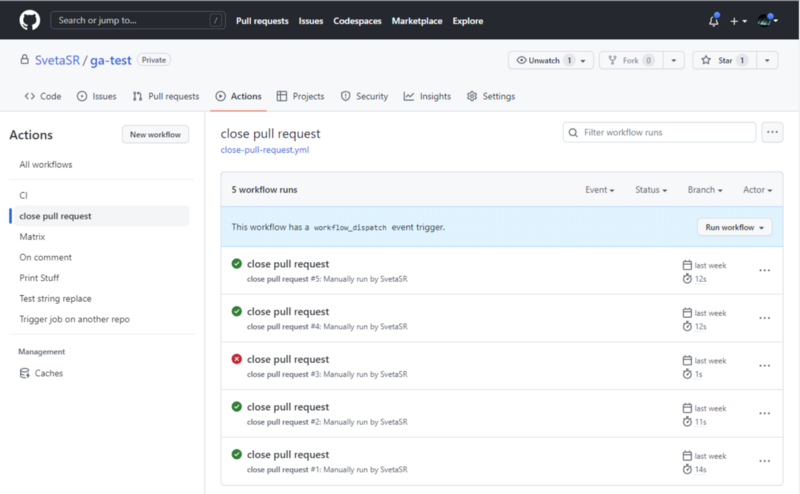
Once you have at least one workflow, you'll be able to manage them from the same page, as well as dispatch, re-run failed jobs, and view the status of previous runs.
Understanding the workflow's structure
Let's examine this basic workflow that says hi to the person who initiated the run and then runs some tests, and understand the different parts that it's constructed from.
name: CI

on:
  push:
  pull_request:

jobs:
  unit-tests:
    runs-on: ubuntu-latest
    steps:
      - uses: actions/checkout@v3
      - name: Install
        run: npm install
      - name: Run unit tests
        run: npm test
  e2e-tests:
      runs-on: ubuntu-latest
      steps:
        - uses: actions/checkout@v3
        - name: Install
          run: npm install
        - name: Run unit tests
          run: npm e2e
First, we need to define the workflow's settings. We can see that this workflow has three properties: name, on, and jobs.
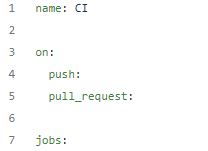
name is simply the workflow's name. It's not mandatory, however, I still recommend adding one, so it'll be easier to manage your workflows in the "Actions" tab.
on defines the trigger of the workflow. You can set one or more. For instance, in the example shown above, the workflow will run whenever a pull request is opened or a push to any branch occurs.
If you want to make your trigger more specific, you can provide extra parameters. Each trigger event is different, so let's have a look at some examples.
1. A push to specific branches
on:
  push:
    branches:
      [master, test]
In this one, we want the workflow to run on a push event, but only when the branch name equals the ones we provide using the branches property. In this case, it's "master" or "test". If we push something to a branch named "test2", nothing will happen.
By the way, in YAML arrays can be defined with square brackets or like so:
on:
  push:
    branches:
      - master
      - test
This is the exact same thing! You might see both styles in use, and it's up to your preference.
Anyway, we can be even more specific, for instance, mention only branches that start with tests/:
on:
  push:
    branches:
      - tests/**
Or do the opposite and accept all branches but ignore everything that starts with tests/ by using branches-ignore instead of branches
on:
  push:
    branches-ignore:
- tests/**- Scheduled workflow
on:
  schedule:
    - cron: '0 6 * * *'
We can make our workflow run automatically on a scheduled basis, using the schedule trigger. In this example, the workflow will run every day at 6:00 AM. You can see that schedule receives an array, so you can add multiple cron settings if you wish.
- Manual workflow dispatch
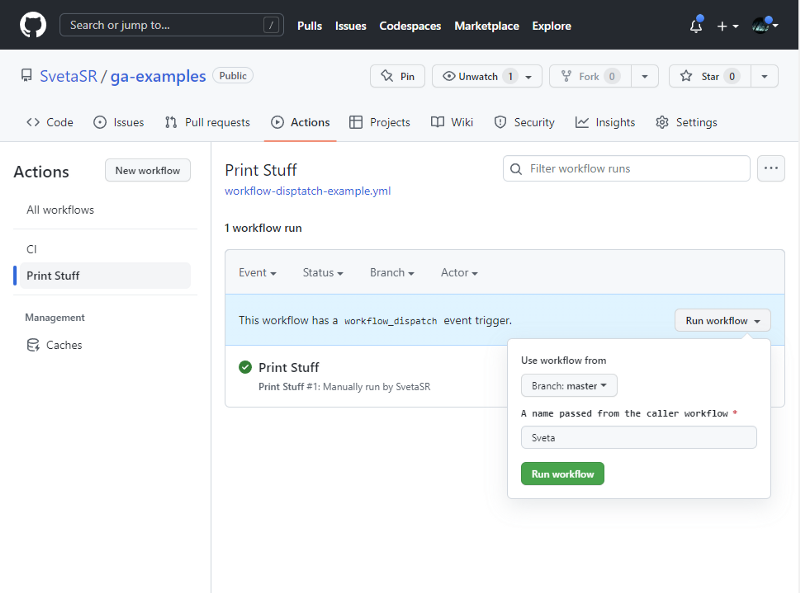
Another common trigger is workflow_dispatch which allows us to manually trigger the workflow directly from the GitHub Actions UI. It can even be configured to require parameters that can be later accessed by our actions.
on:
  workflow_dispatch:
    inputs:
      name:
        type: string
        default: Sveta
        required: true
        description: 'A name passed from the caller workflow'

jobs:
  print:
    runs-on: ubuntu-latest
    steps:
      - name: Print the name
        run: echo "Hi there, ${{ inputs.name }}"
This is what it looks like inside the GitHub UI:
There are many more possible triggers and configurations, so going to the documentation is the best place to learn more.
ℹ️ Note
When you see an expression wrapped with ${{}} know that it's a way to access a variable's value, as seen in the example above. This is the way to get context information (like which branch we're on), secrets, our workflow's input values, and more.
run: echo "Hi there, ${{ inputs.name }}"Let's get things running: the "jobs" property
So up until now, we set up a trigger to our workflow, but now let's get into what the workflows are actually doing - running jobs that trigger our actions!
When creating a workflow you can set it to run one or more jobs.
Unless configured otherwise, jobs run in parallel and don't depend on previous jobs to finish first.

In the scenario above, our workflow runs two jobs: "unit-tests" and "e2e-tests", and while the workflow is activated, the jobs will run simultaneously. We will see later how we can create dependencies between jobs.
To define a job, we first give it an id (can be anything we like), and then we need to provide it with some configuration.
There are 2 mandatory parameters:
runs-on: This configures the job's runner. Runners are virtual machines (VMs) used to run the tasks defined in our jobs. GitHub provides hosted runners for each operating system (Linux, macOS, and Windows). You can see the full list of available runners here, as well as their specifications. If you require more granular control over your VM, you can self-host your own runners. One use case for using self-hosted runners is resource utilization. If you need to run your actions on stronger machines, explore this option.steps- Here we list the array of actions the job will execute. The steps are executed one by one. We will go over actions in the next section.
Some notable optional parameters:
name- Just like with workflows, it is not mandatory to provide a name for your job, but it's useful for visualization of your flow.needs- Remember that we said that jobs don't depend on each other, and run in parallel? But we can create this dependency by using the "needs" param. Let's see the example below:
jobs:
  unit-tests:
    runs-on: ubuntu-latest
    steps:
      - uses: actions/checkout@v3
      - name: Install
        run: npm install
      - name: Run unit tests
        run: npm test
  e2e-tests:
      runs-on: ubuntu-latest
      steps:
        - uses: actions/checkout@v3
        - name: Install
          run: npm install
        - name: Run unit tests
          run: npm e2e
  send-slack-notification:
      needs: [unit-tests, e2e-tests]
      runs-on: ubuntu-latest
      steps:
        - uses: actions/checkout@v3
        - name: Send notification
          uses: rtCamp/action-slack-notify@v2
          env:
            SLACK_WEBHOOK: ${{ secrets.SLACK_WEBHOOK }}
            SLACK_CHANNEL: team-ci
            SLACK_TITLE: Finished running tests
            SLACK_MESSAGE: 'Hooray :rocket:'
We can see that the last job, send-slack-notification requires unit-test and e2e-tests to finish, since we want to send that slack notification only when both of these jobs are done executing.
if- We can add a condition to our job that will allow us to set it to run only if some condition/s are met. For instance, let's say that our workflow can be triggered by both push and pull_request events, but we want to run a specific job in this flow that will only run if the trigger was specifically a "push" event.
name: Test
on:
  push:
  pull_request:

jobs:
  print-something-on-push:
    if: github.event_name == 'push'
    runs-on: ubuntu-latest
    steps:
      - name: Print
        run: echo "This job runs on push only".
  print-always:
      runs-on: ubuntu-latest
      steps:
        - name: Print
run: echo "This job always runs".outputs- A job can produce an output that can later be accessed by other jobs (combined withneedsof course, as we have to wait for that job to resolve first). The output is an object, so you can pass any number of parameters that you want.
name: Job outputs test
on:
    workflow_dispatch:
        inputs:
            version:
                description: "Version"
                required: true
                type: string
jobs:
    prepare-version-id:
        runs-on: ubuntu-latest
        outputs:
            version_w_hyphens: ${{ steps.replace-string.outputs.replaced }}
        steps:
          - uses: frabert/replace-string-action@v2
            id: replace-string
            with:
              pattern: '\.'
              string: ${{ inputs.version }}
              replace-with: '-'
          - name: "print"
            run: echo ${{ steps.replace-string.outputs.replaced }}
    print-stuff:
        needs: [prepare-version-id]
        runs-on: ubuntu-latest
        steps:
          - name: "print version id from another job"
            run: echo ${{needs.prepare-version-id.outputs.version_w_hyphens}}
In this example, we have a workflow that expects a string input called version on dispatch.
Then, let's imagine that we need this version for multiple usages, and some of them require us to replace the dots in the string with hyphens.
prepare-version-id:
    runs-on: ubuntu-latest
    outputs:
       version_w_hyphens: ${{ steps.replace-string.outputs.replaced }}
We can see that prepare-version-id defines the outputs object, with one item - version_w_hyphens which returns the value of the step that was responsible for replacing the dots with hyphens. Actions can return output as well, but more on that later.
Then inside the other job called print-stuff we can access this value by calling needs.[job-id].outputs.[outpus-key] and in our case needs.prepare-version-id.outputs.version_w_hyphens.
Now to the star of the show: Actions
As we stated before, jobs run an array of steps, where each step executes an action, where an action is a set of commands or tasks. There are 3 kinds of actions you can work with.
- Using open-sourced actions
For the most part, there's a high probability that someone already has created a solution for at least some of the tasks you wish to accomplish. For instance, if you need to send a slack notification, publish to GitHub pages, upload an artifact, and so on, the community has got you covered.
steps:
  - name: Checkout
    uses: actions/checkout@v3
This is an example of one of the most useful public actions there are, that allows you to checkout to the branch that's in the workflow's context (or to another one if you wish).
All you have to do in order to use such an action is to create a step with the uses property and provide the action's location, ie [github-user]/[repo]@[version].
You can specify a specific version, for example @v3 in that case, or simply refer to the latest possible version by using @master (though then you're opening yourself to be affected by bugs or breaking changes).
That's it. You don't have to actually install or configure anything.
Some actions might expect some input parameters (or have some optional ones). In that case, all you have to do is to add thewith: property to the step and pass the required values.
steps:
- uses: frabert/replace-string-action@v2
  name: Replace string
  id: replace-string
  with:
    pattern: '\.'
    string: ${{ inputs.version }}
    replace-with: '-'
Some actions might also return some sort of output. For instance, in this example, we use this action to run some regex expression on a string, so naturally, we need the result.
To do that we will need to provide an id to the step, so we can access it later by calling steps.[step-id].outputs.[key].
steps:
  - uses: frabert/replace-string-action@v2
    id: replace-string
    with:
      pattern: '\.'
      string: ${{ inputs.version }}
      replace-with: '-'
  - name: "print replaced value from previous step"
    run: echo ${{ steps.replace-string.outputs.replaced }}
⚠️ You should use caution with 3rd party actions as they may contain malicious code or vulnerabilities that can compromise the security of your project and lead to a data breach or other negative consequences. Make sure to check if the action is properly maintained and has a community base.
- Running shell commands
We can also run our own code, by running shell commands. The default depends on the kind of runner you're using. For instance, for Linux (ubuntu) it would use bash. You can change the shell type by providing an explicit one. See all the possible shells here.
steps:
  - name: Run install
    run: npm install
    shell: bash #an optional setting
To run a multiline script, we can use a pipeline, like so:
steps:
  - name: Run install and test
    run: |
        npm install
        npm test
In case we want our action to provide an output that can be accessed by other actions, we have to run the following command:
- name: Set output
  run: echo "{name}={value}" >> $GITHUB_OUTPUT
We can set as many as we want. Accessing the values from other steps follows the same convention as mentioned in the previous section.
steps:
  - id: example
    run: |
      echo "animal='Dog'" >> $GITHUB_OUTPUT
      echo "name='Fluffy'" >> $GITHUB_OUTPUT
  - name: Print
    run: |
      echo "Animal type: ${{steps.example.outputs.animal}}"
echo "Animal name: ${{steps.example.outputs.name}}"- Running an action from a file
Let's say we have a custom-made action that we use in multiple workflows and we don't want to repeat writing. In that case, we can create an action.yml file and store it inside our repo inside the following path: .github/actions/[action-id]/action.yml.
Here's an example action that's using the composite action method where you can create an action with the regular YML syntax and run one or more steps:
name: 'My Action'
description: 'An example of a custom action'
inputs:
  message:
    description: 'A message to print'
    required: true

runs:
  using: composite
  steps:
    - run: echo Hello ${{ inputs.message }}.
      shell: bash
Then we can refer to it by calling it like this:
name: My Workflow
on: push
jobs:
  print-message:
    runs-on: ubuntu-latest
    steps:
    - name: Print message
      uses: ./.github/actions/my-action
      with:
        message: 'Hello, world!'
There are other methods to create actions, where you create the action.yml file just to set up the input and output params and the script itself is written in other languages of your choice (JS, python, shell, and more). You can read about it here.
Some other action settings
Actions have some other parameters that are worth mentioning.
Of course, the name parameter, which again will make it easier to follow in the log, but the most useful one is if. We already discussed it as a possible parameter for jobs, but actions can also be limited to running only on condition.
One of the useful conditions we can check for is the job's status. For instance, send a failure message to Slack, but only when the job has failed. See the full list of status checks here.
steps:
  ...
  - name: The job has succeeded
    if: ${{ success() }}
    run: # do something if all the previous steps have finished successfuly
  - name: The job has failed
    if: ${{ failure() }}
    run: # do something if the job has filed
Another useful action property is continue-on-error. By default, if one step of a job failed, it will cause the entire job to end with the "failure" status. However, sometimes we might want to not count this failure as part of the whole job's status. In that case, we can pass this property to make the run ignore this step's status.
steps:
  - name: Ignore my failure
    continue-on-error: true
Testing our workflow
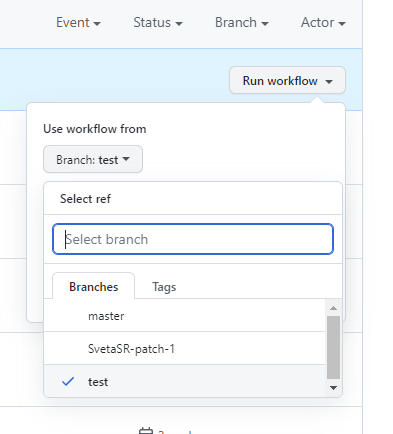
So now that we have a workflow, how do we actually test it? Well, it's simple and tricky at the same time. To be able to run a workflow its file must either exist on the master/main branch or use a trigger that occurs when pushing to the branch we're writing our action on.
If the workflow happens to have a worflow_dispatch trigger and we want to try some changes, we can apply them to a branch, add initiate the workflow from our branch.
There is also another way that allows you to run actions locally on your machine, but it's a little trickier to set up. You can read about it here.
And that's it! These were the basics of what you need to know to get started with GitHub actions. Hope you will find it useful!
